Muscadines, like grapes, are vines that like to climb on things and really should be given a way to keep off the ground. I did plenty of research into the traditional methods of trellising muscadines, but really didn’t want to setup a wire system. Since the wires are in pretty high tension, and made higher by the weight of the plant and fruit, it isn’t structurally sound without a space grabbing anchoring system. Then, I came across the pergola. Just a simple structure, but since wooden boards are used instead of wires, there are no tensioned wires and no need to have an extended anchor system.
With the structure decided, I, of course, drafted the pergola, and made my shopping list. Building a pergola is actually pretty easy, and there are plenty of how-tos on the web.
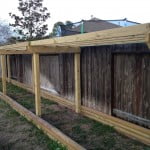
You start by digging a post hole. The hole should be 2’x2’x2′. Mine were a little smaller. More like 15″ dia.x15″ deep. Texas law prohibits digging deeper than 16″ without first calling 811 to have the utilities marked. I didn’t want to mess with any of that and certainly didn’t want to risk cutting any utility lines, so I limited the digging to 15″. I measured it.
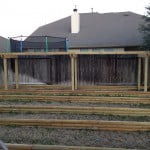
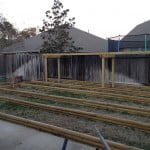
After digging the hole, you take a 4×4, set it in the hole, level it and cement it in place. Most of the how-tos also mention staking it in place to keep it level while the concrete sets. I couldn’t figure that part out, so I just poured a bag and a little extra of fast setting concrete, dry, into the hole and then made any minor remaining leveling adjustments. Just add water and in a few hours, I had extremely sturdy columns. Each column was cut from a 7′ 4×4 so that it’s top was 5′-8 1/2″ above the ground. This was so the entire pergola would only be 6′ tall after placing a 2×4 upright on top of the posts. I placed a total of 8 columns in four pairs inside what was to become the fruit bed.
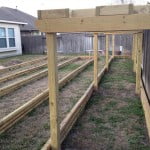
Between each pair of columns, I attached a pair of 2×6’s to act as the lintels. It was more important that these be at the correct elevation above the ground than the columns, so I even invested in a self leveling lazer level.
With the lintels attached, I moved on to the rafters. Typical pergola design has purlins attached crosswise over the tops of the rafters as an additional support and reinforcement structure. I still don’t see much of a benefit to this approach since what makes one rafter fall may make them all fall at the same time. Instead, I cut 2×4 spacers a positioned them perpendicularly to the 2×4 rafters. I had to stagger the spacer placement and work through a few other order of operations issues in order to piece together the rafter assembly. Securing the rafters to the lintels is usually done by toenailing the rafter into the lintel. I tried this on the first rafter and ended up with a very crooked rafter as the toenailing pulled the rafter over. The added spacers were thoroughly attached to the rafter and toenailing was then unable to move the rafter.
Here are some pictures of the completed pergola. The third picture really shows the lintels and the spacers.